Showing posts with label eggs. Show all posts

Tuesday, March 12, 2013

Checked My Hive

It seems like it has been forever since I was able to go check on my bees. I wanted to ensure that they were doing ok but every week seemed to bring in bad weather. It would either snow, rain or be well below 50 degrees. I was able to quickly work my hive 3 weeks ago but that was just to throw on some fondant and add corn syrup to my hive top feeder. This past weekend was the first decent weekend that I had a full day of sunshine.

As I got to my hive, I saw that my girls were out and about, bringing in pollen. That was a great sign. What wasn't so great was seeing twenty or thirty bees dead on the ground in front of my hive. Assuming that it was disease or starvation (again, it has been 3 weeks since I last checked my hive) I began to get worried about what I would find.
Bringing in Pollen
Dead Bees in Front of Hive
The corn syrup in my hive top feeder was mostly crystalized but there were a lot of bees still feeding from it. Using my hive top, I started scrapping it out but found that it was still soft and moist so I sat it to the side for the time being. I continued checking my hive bodies and supers. There were a lot of bees between the frames and when checking my frames, I saw all stages of the brood process. I did not find my queen but I knew everything was good, having seen eggs and larva.

When I got down to my bottom brood chamber, it was completely empty. No bees, brood or honey stores. The bees must have moved up over winter. I took off the bottom brood chamber so that I could move it to the top and give my girls more room to move up if need be. As I took off the hive body, I noticed a few bees were dead on the bottom board. It all came together now with the dead bees laying at the front of my hive. Some of my girls had died over winter and the colony was cleaning them out.

All is good in the hive. My bees were looking good, I added more fondant, reversed my brood chambers and removed my hive top feeder.

I am ready for spring to come!

Friday, May 18, 2012

Adding a Honey Super

It has been a couple weeks since I have had a chance to check on my hive. The nectar flow has been tremendous with little spurts of rain here and there. To give you an update on where I am with my hive, I took a picture of the three brood chambers.

Bee Hive
Bee Hive


Here is a time frame of what I have done since purchasing my hive:


Weekly Time Frame
What was done during the week


Week 1


I purchased my Hive Equipment along with a package of bees. Painted the outside of all wooden components. Set up my hive in its location.


Week 2


Installed my package of Bees


Week 3


Removed the queen cage from the hive. Made sure she was released and laying. All was good and experienced my first bee stings of the season.


Week 4


Installed another Brood Chamber

Week 6


Installed another Brood Chamber

Week 8


About to install my first Honey Super


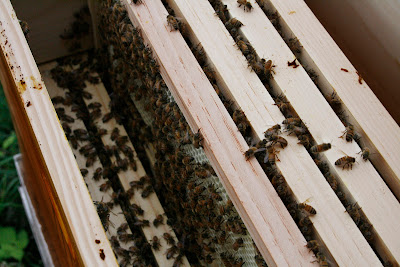
When going out to check on my hive, I was hoping to find that my third Brood Chamber would be filled with eggs and larva, just ready to burst. With that expectation in mind, it was a great sign when I removed the inner cover to find all my frames had drawn out comb. Removing the first frame I did not see any sign of brood or larva within the cells, only nectar and pollen. As I began to move into the center frames, I was finding the frames were mostly honey and nectar rather than laid eggs. This was not a good or bad sign, it just meant that the nectar flow was so good and the queen didn't find any need to continue laying in the upper brood chamber, at least I was hoping so.

Checking My Frames
Checking the Frames


I started working down into my next brood box and I began seeing plenty of eggs and larva within the cells. My queen was present and still laying, she just did not have the need to move into the upper brood box. My intent was to add a honey super onto my hive and after speaking with my mentor, he suggested that I take the center four frames from my upper brood box and transport them into my honey super. With it being mostly nectar and pollen in these frames, it will give the bees incentive to move up and begin to work the other frames in my honey super.

Frames in the hive
Removed Four Frames

Note: If i was not able to transfer these frames into my honey super I would have sprayed my foundation with sugar water to entice the bees to move up.

When talking to another beekeeper, he had mentioned that another option would have been to add a super beneath the brood chamber that was mostly nectar and pollen. He said that this would relieve congestion within my hive. 

I went with my mentors approach and transported four frames into my honey super and replaced them with frames containing foundation. Placed a queen excluder on top of my brood chambers, set my honey super on top and closed off my hive. By placing a honey super on so late I probably will not be able to harvest honey this year. Those frames that do contain honey will more than likely be used as feeding frames.

I can still hope though!

Wednesday, May 2, 2012

Adding Another Brood Chamber

Before I stepped into managing my bee hive, I read books and watched videos. There was a lot of good information out there and some great demos but I can now see how hard it could be to capture every aspect of beekeeping. I'm sure that at some point I had read about this or seen photos describing it, but when I went out to my bee hive to add an additional brood chamber, I had noticed some weird formations in the comb that was being drawn out.

Photo By: Chris Bednarek

I saw that the drawn comb was forming specifically where my frames were spaced further apart and no where else. I was hesitant about pulling out the frame because they had attached the comb to the opposite frame.
I began removing the frames from the edge, working my way toward the gaped frames. Using my hive tool, I scraped the comb off from one of the frames. I knew that removing the frame would tear out the comb from the other, but it had to be done. Once the frame was removed, I was able to pull off the excess comb so that the frames could be properly set within my hive body.

Just another learning experience from a newbie.